Difference between revisions of "METEL IEC 61131-3 IDE Getting Started"
(English corrections) (Tag: Visual edit) |
|||
| (14 intermediate revisions by the same user not shown) | |||
| Line 3: | Line 3: | ||
You will be able to create, edit and debug IEC 61131-3 (ST, LD, IL, FBD) programs for METEL PLC controllers using a professional IDE (Integrated Development Environment). Based in the world wide recognized Eclipse IDE, the METEL IEC 61131-3 IDE is an extremely easy to use, yet powerful, programming tool. | You will be able to create, edit and debug IEC 61131-3 (ST, LD, IL, FBD) programs for METEL PLC controllers using a professional IDE (Integrated Development Environment). Based in the world wide recognized Eclipse IDE, the METEL IEC 61131-3 IDE is an extremely easy to use, yet powerful, programming tool. | ||
| − | In fact, METEL IEC 61131-3 IDE is a translater IEC 61131-3 programs to standard C code which you can compile and run | + | In fact, METEL IEC 61131-3 IDE is a translater IEC 61131-3 programs to standard C code which you can compile and run inside the METEL hardware with debugging possibility. |
== The Main purpose == | == The Main purpose == | ||
| Line 9: | Line 9: | ||
* Create, edit and debug IEC 61131-3 LD, ST, IL and FBD programs on your computer. | * Create, edit and debug IEC 61131-3 LD, ST, IL and FBD programs on your computer. | ||
| − | * Use | + | * Use of state of the art graphic editors and simulators for Ladder and Function Block Diagram (FBD) languages. |
* Powerful high-level on-hardware debugger. Simulate and debug programs running in your PLC. | * Powerful high-level on-hardware debugger. Simulate and debug programs running in your PLC. | ||
| Line 15: | Line 15: | ||
* GEB generates readable and efficient standard C code, and creates a binary using your platform C compiler. | * GEB generates readable and efficient standard C code, and creates a binary using your platform C compiler. | ||
| − | <p style="margin-left: 20px;"> [http://www.metel.eu/ | + | <p style="margin-left: 20px;"> [http://www.metel.eu/en/products?categoryId=153&productId=248 Go to Web Page] </p> |
| − | + | = How to Start = | |
| − | + | == 1. Download IDE == | |
| − | <p style="margin-left: 16px;"> | + | <p style="margin-left: 16px;"> Download METEL IEC 61131-3 IDE from the METEL website [http://www.metel.eu www.metel.eu] in the software section or on the link: {{Template:DownloadIEC61131-3}} </p> |
| − | 2. | + | == 2. Installation == |
| + | <p style="margin-left: 16px;"> Unzip and open downloaded file, installation will start automatically. During the installation follow the instructions in the Installation Wizard. </p> | ||
| − | 3. During the installation on your desktop was created | + | == 3. Run Program == |
| − | + | <p style="margin-left: 16px;"> During the installation on your desktop an IDE icon was created, right click '''Run program as administrator'''. </p> | |
| − | |||
| + | == 4. New Project == | ||
| + | <p style="margin-left: 16px;"> Create a new project '''File->New->New GEB 61131 project''' </p> | ||
[[File:IEC-61131-3 IDE ProjectCreating.png|500px]] | [[File:IEC-61131-3 IDE ProjectCreating.png|500px]] | ||
| − | 5. | + | == 5. Write the Name of the Project. == |
<p style="margin-left: 16px;"> '''If the project or POU name is more than one word, replace the space between words for example with the underscore!''' </p> | <p style="margin-left: 16px;"> '''If the project or POU name is more than one word, replace the space between words for example with the underscore!''' </p> | ||
| Line 40: | Line 42: | ||
| − | 6. | + | == 6. Create a New POU (Program Organization Unit) == |
| − | <p style="margin-left: 16px;"> | + | <p style="margin-left: 16px;"> On the left, the “Project Explorer”shows the projects in the Workspace. The new one is empty. Right click to project opens the menu. </p> |
[[File:IEC-61131-3 IDE POUCreating.png|300px]] | [[File:IEC-61131-3 IDE POUCreating.png|300px]] | ||
| − | 7. | + | == 7. Name a New POU == |
| − | <p style="margin-left: 16px;"> For pairing METEL PLC unit and software it is important to import the Variables as inputs and outputs of PLC to METEL IDE as a | + | <p style="margin-left: 16px;"> Select one of the 4 languages (textual or grafical) and POU type. </p> |
| + | <p style="margin-left: 16px;"> For pairing METEL PLC unit and software it is important to import the Variables as inputs and outputs of PLC to METEL IDE as a structured text. </p> | ||
[[File:IEC-61131-3 IDE POUName.png|300px]] | [[File:IEC-61131-3 IDE POUName.png|300px]] | ||
| − | 8. | + | == 8. Copy Variables of PLC to Textual POU Variables == |
| − | <p style="margin-left: 16px;"> - Go to PLC website | + | <p style="margin-left: 16px;"> - Go to PLC website through the IP address of the device. All metel devices have a uniq IP address which you can see on the housing, for example http://10.68.0.6/metel/iec_61131-3/ </p> |
| − | <p style="margin-left: 16px;"> - Copy | + | <p style="margin-left: 16px;"> - Copy all Variables text to the clipboard. </p> |
| − | <p style="margin-left: 16px;"> - Overwrite default text by Variables text of PLC ( | + | <p style="margin-left: 16px;"> - Overwrite default text by Variables text of PLC (on the clipboard). </p> |
[[File:IEC-61131-3 IDE PLCVariables.png|210px]] [[File:IEC-61131-3 IDE IDEVariables.png|300px]] | [[File:IEC-61131-3 IDE PLCVariables.png|210px]] [[File:IEC-61131-3 IDE IDEVariables.png|300px]] | ||
| − | 9. | + | == 9. POU Program == |
| − | <p style="margin-left: 16px;"> Right click | + | <p style="margin-left: 16px;"> Create a new POU for part of your program via Function Blocks by Right click on project -> '''Create new POU''' </p> |
[[File:IEC-61131-3 IDE POUProgram.png|300px]] | [[File:IEC-61131-3 IDE POUProgram.png|300px]] | ||
| − | 10. | + | == 10. Creating a Program == |
| − | <p style="margin-left: 24px;"> Insert Input and Output variables by | + | <p style="margin-left: 24px;"> Insert Input and Output variables by clicking hold and moving the cursor to the POU program. </p> |
<p style="margin-left: 50px;"> '''Expression''' - Input variables </p> | <p style="margin-left: 50px;"> '''Expression''' - Input variables </p> | ||
<p style="margin-left: 50px;"> '''Variable Ref''' - Output variables </p> | <p style="margin-left: 50px;"> '''Variable Ref''' - Output variables </p> | ||
| Line 74: | Line 77: | ||
[[File:IEC-61131-3 IDE VariablesName.png|500x500px]] | [[File:IEC-61131-3 IDE VariablesName.png|500x500px]] | ||
| − | 11. ''' | + | == 11. Declaration of Variables == |
| − | <p style="margin-left: 24px;"> | + | <p style="margin-left: 24px;"> '''All variables must be declarated in the Ladder Variables''' </p> |
| + | <p style="margin-left: 24px;"> Click the '''Add Variable''' button in the right bottom corner and enter properties. </p> | ||
<p style="margin-left: 50px;"> '''Variable’s name''' – name the variable same as Variables POU. </p> | <p style="margin-left: 50px;"> '''Variable’s name''' – name the variable same as Variables POU. </p> | ||
<p style="margin-left: 50px;"> '''Data type''' – data type of variable, for example BOOL variable has only two states (log. 1 and log. 0), same as is declarated in Variables POU. </p> | <p style="margin-left: 50px;"> '''Data type''' – data type of variable, for example BOOL variable has only two states (log. 1 and log. 0), same as is declarated in Variables POU. </p> | ||
| − | <p style="margin-left: 24px;"> '''Variable type''' – type of variable, type EXTERNAL contains all variables of PLC, other | + | <p style="margin-left: 24px;"> '''Variable type''' – type of variable, type '''EXTERNAL''' contains all variables of PLC (hardware), other are using in the program operation units. </p> |
[[File:IEC-61131-3 IDE VariablesDeclaration.png|500x500px]] | [[File:IEC-61131-3 IDE VariablesDeclaration.png|500x500px]] | ||
| − | 12. | + | == 12. Function Blocks == |
| − | + | <p style="margin-left: 24px;"> '''Interconnections of the variables are via Function Blocks'''. Function Blocks is a small program which performs various functions as logical OR,AND, TIMERS, COUNTERS and many others. For help with selection of one of them press the '''F1''' button on the Functions block form. </p> | |
| − | <p style="margin-left: 24px;"> | ||
<p style="margin-left: 20px;"> The Functions block selected with a data type declaration as AND_BOOL depends on the data type of input variables. | <p style="margin-left: 20px;"> The Functions block selected with a data type declaration as AND_BOOL depends on the data type of input variables. | ||
| − | It is a possible to select the Function block of lists without data type declaration, then the data type of the function block | + | It is a possible to select the Function block of lists without data type declaration, then the data type of the function block will be automatically selected according to the data type of the input variables. </p> |
[[File:IEC-61131-3 IDE FunctionBlockType.png |500x500px]] | [[File:IEC-61131-3 IDE FunctionBlockType.png |500x500px]] | ||
| − | To display the '''METEL Functions | + | To display the '''METEL Functions Blocks''' go to Project and select Build all, after it will be visible on the list of blocks as well. |
[[File:IEC-61131-3 IDE ProjectBuildAll.png]] | [[File:IEC-61131-3 IDE ProjectBuildAll.png]] | ||
| − | 13. '''Interconnections between all objects''' on POU are via dragging of left to right side. | + | == 13. Interconnection == |
| + | <p style="margin-left: 24px;"> '''Interconnections between all objects''' on POU are via dragging of left to right side. </p> | ||
[[File:IEC-61131-3 IDE Dragging.png]] | [[File:IEC-61131-3 IDE Dragging.png]] | ||
| − | 14. | + | == 14. RUN and DEBUG Mode (Uploading Binary to PLC)== |
<p style="margin-left: 24px;"> METEL IDE allows you to work with the project in '''RUN''' and '''DEBUG''' mode from inside the IDE, both in a '''Simulator''' and also in binary, from the device itself. The debugger lets you place breakpoints, step and watch variables from the IEC 61131-3 programs. </p> | <p style="margin-left: 24px;"> METEL IDE allows you to work with the project in '''RUN''' and '''DEBUG''' mode from inside the IDE, both in a '''Simulator''' and also in binary, from the device itself. The debugger lets you place breakpoints, step and watch variables from the IEC 61131-3 programs. </p> | ||
| Line 112: | Line 116: | ||
| − | + | === Build the Project and Upload Binary to METEL PLC with DEBUG Properties === | |
<p style="margin-left: 24px;">Select the RUN button -> Debug As -> GEB application </p> | <p style="margin-left: 24px;">Select the RUN button -> Debug As -> GEB application </p> | ||
| Line 119: | Line 123: | ||
| − | + | === Set the Configuration Parameters for Binary. === | |
<p style="margin-left: 50px;"> '''Project''' - select the main folder of the project which you want to build. </p> | <p style="margin-left: 50px;"> '''Project''' - select the main folder of the project which you want to build. </p> | ||
<p style="margin-left: 50px;">'''Target device''' - select '''iplog_gama.''' </p> | <p style="margin-left: 50px;">'''Target device''' - select '''iplog_gama.''' </p> | ||
| − | <p style="margin-left: 50px;">'''Target address''' - IP address of your device (default IP address is on case). </p> | + | <p style="margin-left: 50px;">'''Target address''' - the IP address of your device (default IP address is found on the case). </p> |
<p style="margin-left: 50px;">'''Times to run''' - how many times the program cycle will, '''0=infinity loop'''. </p> | <p style="margin-left: 50px;">'''Times to run''' - how many times the program cycle will, '''0=infinity loop'''. </p> | ||
| Line 129: | Line 133: | ||
| − | + | === Debug === | |
| + | Click on the Debug icon, '''METEL IDE starts buildin the program''' and generates C code, it compiles the binary and transfers binary to hardware. | ||
| − | At the end of | + | At the end of generating METEL-IDE automatically upload and run the program in PLC, shows the debug mode and state of variables. |
| Line 137: | Line 142: | ||
| − | + | == Recommendations == | |
| − | - The METEL IDE remembers the previous configuration for DEBUG or RUN, after first configuration | + | - The METEL IDE remembers the previous configuration for DEBUG or RUN, after the first configuration click directly to icon DEBUG or RUN from the main toolbar. |
| − | - Before program editing | + | - Before program editing END the DEBUG mode. |
Latest revision as of 13:12, 13 February 2019
The METEL IEC 61131-3 IDE lets you program in IEC 61131-3 languages, both graphical and textual.
You will be able to create, edit and debug IEC 61131-3 (ST, LD, IL, FBD) programs for METEL PLC controllers using a professional IDE (Integrated Development Environment). Based in the world wide recognized Eclipse IDE, the METEL IEC 61131-3 IDE is an extremely easy to use, yet powerful, programming tool.
In fact, METEL IEC 61131-3 IDE is a translater IEC 61131-3 programs to standard C code which you can compile and run inside the METEL hardware with debugging possibility.
Contents
- 1 The Main purpose
- 2 How to Start
- 2.1 1. Download IDE
- 2.2 2. Installation
- 2.3 3. Run Program
- 2.4 4. New Project
- 2.5 5. Write the Name of the Project.
- 2.6 6. Create a New POU (Program Organization Unit)
- 2.7 7. Name a New POU
- 2.8 8. Copy Variables of PLC to Textual POU Variables
- 2.9 9. POU Program
- 2.10 10. Creating a Program
- 2.11 11. Declaration of Variables
- 2.12 12. Function Blocks
- 2.13 13. Interconnection
- 2.14 14. RUN and DEBUG Mode (Uploading Binary to PLC)
- 2.15 Recommendations
The Main purpose
- Create, edit and debug IEC 61131-3 LD, ST, IL and FBD programs on your computer.
- Use of state of the art graphic editors and simulators for Ladder and Function Block Diagram (FBD) languages.
- Powerful high-level on-hardware debugger. Simulate and debug programs running in your PLC.
- GEB generates readable and efficient standard C code, and creates a binary using your platform C compiler.
How to Start
1. Download IDE
Download METEL IEC 61131-3 IDE from the METEL website www.metel.eu in the software section or on the link: METEL IEC 61131-3 IDE
2. Installation
Unzip and open downloaded file, installation will start automatically. During the installation follow the instructions in the Installation Wizard.
3. Run Program
During the installation on your desktop an IDE icon was created, right click Run program as administrator.
4. New Project
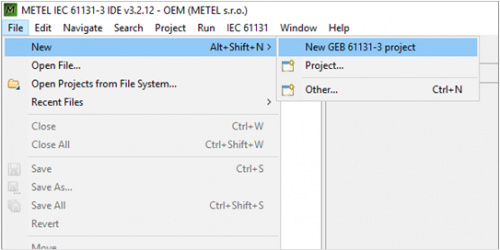
Create a new project File->New->New GEB 61131 project
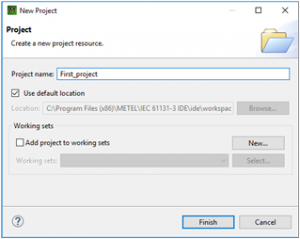
5. Write the Name of the Project.
If the project or POU name is more than one word, replace the space between words for example with the underscore!
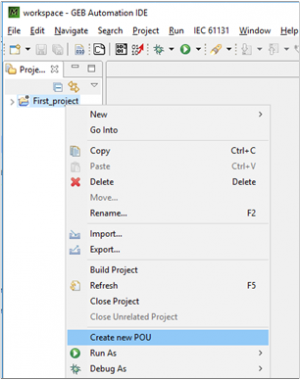
6. Create a New POU (Program Organization Unit)
On the left, the “Project Explorer”shows the projects in the Workspace. The new one is empty. Right click to project opens the menu.
7. Name a New POU
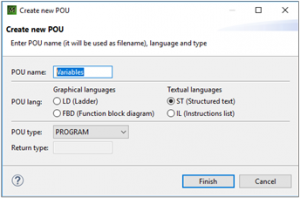
Select one of the 4 languages (textual or grafical) and POU type.
For pairing METEL PLC unit and software it is important to import the Variables as inputs and outputs of PLC to METEL IDE as a structured text.
8. Copy Variables of PLC to Textual POU Variables
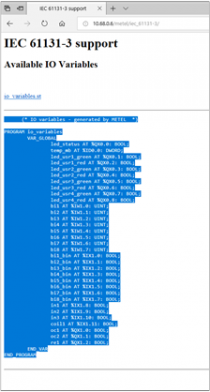
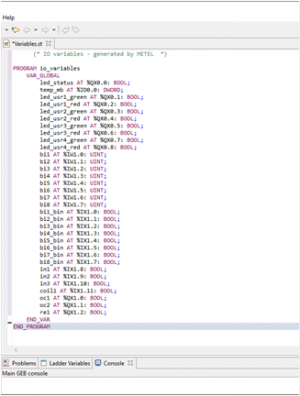
- Go to PLC website through the IP address of the device. All metel devices have a uniq IP address which you can see on the housing, for example http://10.68.0.6/metel/iec_61131-3/
- Copy all Variables text to the clipboard.
- Overwrite default text by Variables text of PLC (on the clipboard).
9. POU Program
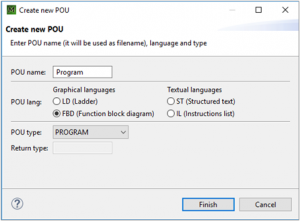
Create a new POU for part of your program via Function Blocks by Right click on project -> Create new POU
10. Creating a Program
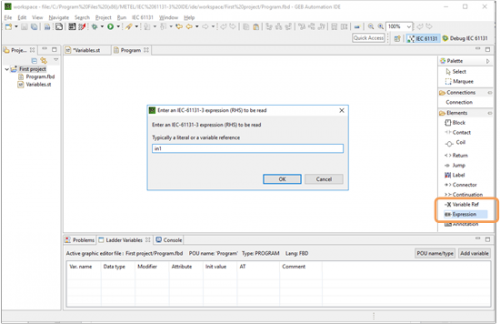
Insert Input and Output variables by clicking hold and moving the cursor to the POU program.
Expression - Input variables
Variable Ref - Output variables
The name of the variable must be in the same form as is declarated in the Variables POU!
11. Declaration of Variables
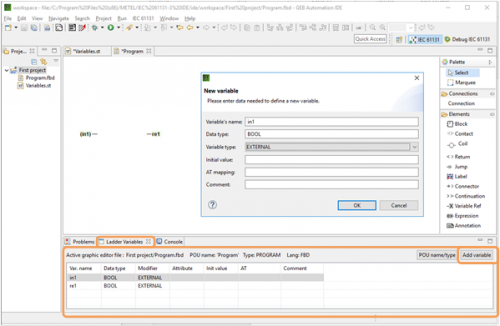
All variables must be declarated in the Ladder Variables
Click the Add Variable button in the right bottom corner and enter properties.
Variable’s name – name the variable same as Variables POU.
Data type – data type of variable, for example BOOL variable has only two states (log. 1 and log. 0), same as is declarated in Variables POU.
Variable type – type of variable, type EXTERNAL contains all variables of PLC (hardware), other are using in the program operation units.
12. Function Blocks
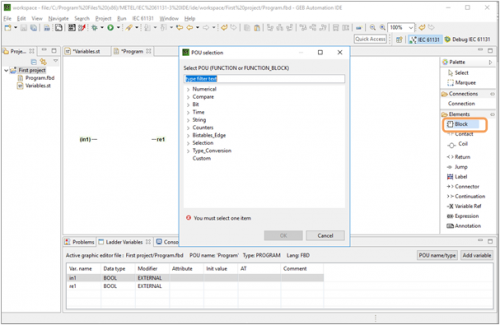
Interconnections of the variables are via Function Blocks. Function Blocks is a small program which performs various functions as logical OR,AND, TIMERS, COUNTERS and many others. For help with selection of one of them press the F1 button on the Functions block form.
The Functions block selected with a data type declaration as AND_BOOL depends on the data type of input variables. It is a possible to select the Function block of lists without data type declaration, then the data type of the function block will be automatically selected according to the data type of the input variables.
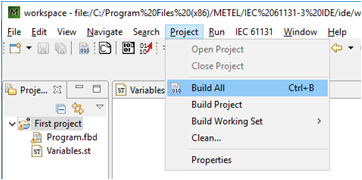
To display the METEL Functions Blocks go to Project and select Build all, after it will be visible on the list of blocks as well.
13. Interconnection
Interconnections between all objects on POU are via dragging of left to right side.
14. RUN and DEBUG Mode (Uploading Binary to PLC)
METEL IDE allows you to work with the project in RUN and DEBUG mode from inside the IDE, both in a Simulator and also in binary, from the device itself. The debugger lets you place breakpoints, step and watch variables from the IEC 61131-3 programs.
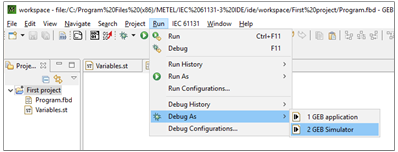
As Simulator - Allows you to run and debug program without hardware.
As Application - Build the project and upload binary to hardware.
Build the Project and Upload Binary to METEL PLC with DEBUG Properties
Select the RUN button -> Debug As -> GEB application
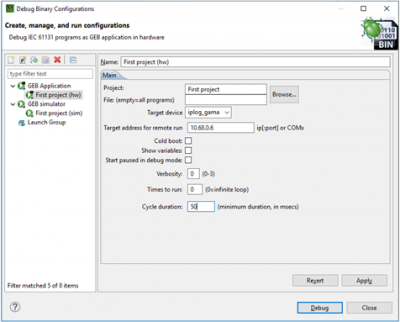
Set the Configuration Parameters for Binary.
Project - select the main folder of the project which you want to build.
Target device - select iplog_gama.
Target address - the IP address of your device (default IP address is found on the case).
Times to run - how many times the program cycle will, 0=infinity loop.
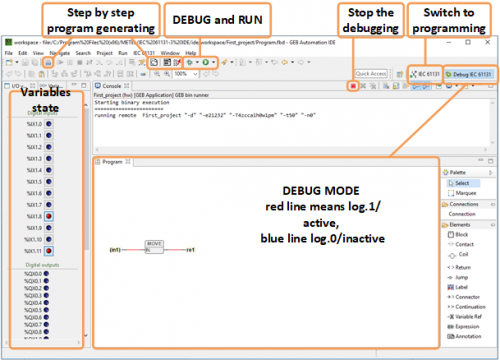
Debug
Click on the Debug icon, METEL IDE starts buildin the program and generates C code, it compiles the binary and transfers binary to hardware.
At the end of generating METEL-IDE automatically upload and run the program in PLC, shows the debug mode and state of variables.
Recommendations
- The METEL IDE remembers the previous configuration for DEBUG or RUN, after the first configuration click directly to icon DEBUG or RUN from the main toolbar.
- Before program editing END the DEBUG mode.
