Difference between revisions of "OpenVPN"
(English corrections) (Tag: Visual edit) |
|||
| Line 1: | Line 1: | ||
| − | |||
| − | |||
= Introduction = | = Introduction = | ||
| − | The purpose of this document is to describe how to create a VPN connection between IPLOG device(s) and server via OpenVPN. | + | The purpose of this document is to describe how to create a VPN connection between IPLOG device(s) and a server via OpenVPN. |
This document describes | This document describes | ||
| − | * OpenVPN server installation and configuration on Debian machine | + | * OpenVPN server installation and configuration on a Debian machine |
| − | * OpenVPN client installation and configuration on IPLOG device | + | * OpenVPN client installation and configuration on an IPLOG device |
* OpenVPN client installation and configuration on Windows 10 machine | * OpenVPN client installation and configuration on Windows 10 machine | ||
| Line 17: | Line 15: | ||
| − | == OpenVPN | + | == OpenVPN Server == |
| − | OpenVPN server is available as standard package in many Linux | + | OpenVPN server is available as a standard package in many Linux distributions. This document is focused on Debian distribution. |
| − | === Install | + | === Install Server === |
| − | The following command | + | The following command installs the OpenVPN package witch contains both the '''server and the client'''. |
{{NotePre | {{NotePre | ||
| Line 45: | Line 43: | ||
|} | |} | ||
| − | + | The following lines need to be included '''/etc/openvpn/server.conf''' | |
| − | The following lines need to | ||
{{NotePre | {{NotePre | ||
| Line 74: | Line 71: | ||
== OpenVPN Client for IPLOG Device == | == OpenVPN Client for IPLOG Device == | ||
| − | OpenVPN client is already installed in all IPLOG devices. | + | The OpenVPN client is already installed in all IPLOG devices. |
=== Configure Client === | === Configure Client === | ||
| Line 92: | Line 89: | ||
|} | |} | ||
| − | + | The following lines need to be included '''/etc/openvpn/client01.conf''' | |
| − | The following lines need to | ||
{{NotePre | {{NotePre | ||
|text= | |text= | ||
| Line 120: | Line 116: | ||
| − | == OpenVPN | + | == OpenVPN Client for Windows == |
| − | This section describes how to install the OpenVPN client | + | This section describes how to install the OpenVPN client into Windows 10. |
=== Install Client === | === Install Client === | ||
| Line 128: | Line 124: | ||
2. Wait until the download completes, and then open it. | 2. Wait until the download completes, and then open it. | ||
| − | 3. Follow the install | + | 3. Follow the install Wizard. |
| − | + | Click on the '''Next''' to start the installation. | |
[[File:Welcome.png|300px]] | [[File:Welcome.png|300px]] | ||
| − | Confirm | + | Confirm the License Agreement. |
[[File:License Agreement.png|300px]] | [[File:License Agreement.png|300px]] | ||
| − | Choose | + | Choose the OpenVPN components you wish to install. |
[[File:Components.png|300px]] | [[File:Components.png|300px]] | ||
| − | Choose | + | Choose the location to run the installatiom and click on the '''Install''' button. |
[[File:File Location.png|300px]] | [[File:File Location.png|300px]] | ||
| − | Wizard automatically starts install all components, when the '''Complete''' label | + | The Install Wizard automatically starts to install all components, when the '''Complete''' label appears continue by clicking '''Next'''. |
[[File:Complete.png|300px]] | [[File:Complete.png|300px]] | ||
| − | Installation is | + | The Installation is completed. '''Show Readme''' allows you to view a basic configuration information. |
[[File:End Wizard.png|300px]] | [[File:End Wizard.png|300px]] | ||
| − | === Configure | + | === Configure Client === |
| − | The files in table below are needed | + | The files in the table below are needed for configuration. These files can be generated and specified in RD-02(TBW). |
{| class="wikitable" | {| class="wikitable" | ||
| Line 174: | Line 170: | ||
| client.ovpn || This file is OpenVPN client configuration. The extension .conf is mandatory, but the filename can be changed. | | client.ovpn || This file is OpenVPN client configuration. The extension .conf is mandatory, but the filename can be changed. | ||
|} | |} | ||
| − | |||
| − | |||
==== a) Run the OpenVPN Program ==== | ==== a) Run the OpenVPN Program ==== | ||
| Line 182: | Line 176: | ||
[[File:OpenVPNMessage.png|200px]] | [[File:OpenVPNMessage.png|200px]] | ||
| − | ==== b) Copy and | + | ==== b) Copy and Edit File ==== |
'''C:\Program Files\OpenVPN\sample-config\client.ovpn''' to '''C:\Users\Root\OpenVPN\config''' | '''C:\Program Files\OpenVPN\sample-config\client.ovpn''' to '''C:\Users\Root\OpenVPN\config''' | ||
| − | The following lines need to | + | The following lines need to be included '''C:\Users\Root\OpenVPN\config\client.ovpn''' |
{{NotePre | {{NotePre | ||
| Line 215: | Line 209: | ||
=== Connection to VPN === | === Connection to VPN === | ||
| − | Right click to OpenVPN icon in | + | Right click to the OpenVPN icon in the notification area of Taskbar, select '''Connect'''. |
[[File:OpenVPNTaskBar.png|300px]] | [[File:OpenVPNTaskBar.png|300px]] | ||
| − | Successful connection is logged in dialog window, '''Initialization Sequence Completed'''. | + | A Successful connection is logged in the dialog window, '''Initialization Sequence Completed'''. |
[[File:OpenVPNConnection.png|300px]] | [[File:OpenVPNConnection.png|300px]] | ||
Latest revision as of 12:34, 13 February 2019
Contents
Introduction
The purpose of this document is to describe how to create a VPN connection between IPLOG device(s) and a server via OpenVPN.
This document describes
- OpenVPN server installation and configuration on a Debian machine
- OpenVPN client installation and configuration on an IPLOG device
- OpenVPN client installation and configuration on Windows 10 machine
OpenVPN
OpenVPN is an open-source commercial software that implements virtual private network (VPN) techniques to create secure point-to-point or site-to-site connections in routed or bridged configurations and remote access facilities. It uses a custom security protocol that utilizes SSL/TLS for key exchange. It is capable of traversing network address translators (NATs) and firewalls. It was written by James Yonan and is published under the GNU General Public License (GPL).
All information about OpenVPN at the link openvpn.net
OpenVPN Server
OpenVPN server is available as a standard package in many Linux distributions. This document is focused on Debian distribution.
Install Server
The following command installs the OpenVPN package witch contains both the server and the client.
metel@debian:~$ apt-get install openvpn
Configure Server
The files, as specified in table below, need to be installed first. These files can be generated, as specified in RD-02(TBW).
| File extension | Description |
|---|---|
| ca.crt | This file contains root CA certificate. |
| server.crt | This file contains server certificate. |
| server.key | This file contains the server private key. |
| dh2048.pem | This file is needed. |
| server.conf | This file is OpenVPN server configuration. The extension .conf is mandatory, but the filename can be changed. |
The following lines need to be included /etc/openvpn/server.conf
# port number and protocol(tcp/udp) can be changed as needed
port 1194
proto tcp

dev tun

ca ca.crt
cert server.crt
dh dh2048.pem

# this is IP adrress range used by OpenVPN server
server 172.16.0.0 255.255.255.0

# the following line enables communication among clients
client-to-client

comp-lzo
persist-key
persist-tun
OpenVPN Client for IPLOG Device
The OpenVPN client is already installed in all IPLOG devices.
Configure Client
The files in table below are needed before configuration. These files can be generated, as specified in RD-02(TBW).
| File extension | Description |
|---|---|
| ca.crt | This file contains root CA certificate. |
| client01.crt | This file contains client certificate. |
| client01.key | This file contains the client private key. |
| client01.conf | This file is OpenVPN client configuration. The extension .conf is mandatory, but the filename can be changed. |
The following lines need to be included /etc/openvpn/client01.conf
client

proto tcp
remote vpn.iplog.eu 1195

dev tun

resolv-retry infinite
nobind

persist-key
persist-tun

ca ca.crt
cert client01.crt
key client01.key

comp-lzo
route-method exe
route-delay 2
OpenVPN Client for Windows
This section describes how to install the OpenVPN client into Windows 10.
Install Client
1. Download installation file at the link Download OpenVPN.
2. Wait until the download completes, and then open it.
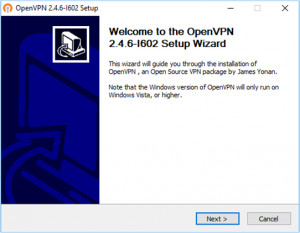
3. Follow the install Wizard. Click on the Next to start the installation.
Confirm the License Agreement.
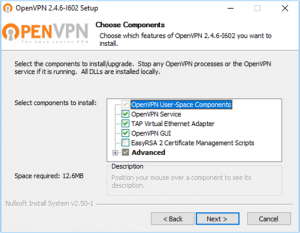
Choose the OpenVPN components you wish to install.
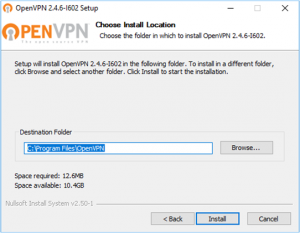
Choose the location to run the installatiom and click on the Install button.
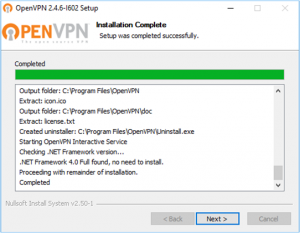
The Install Wizard automatically starts to install all components, when the Complete label appears continue by clicking Next.
The Installation is completed. Show Readme allows you to view a basic configuration information.
Configure Client
The files in the table below are needed for configuration. These files can be generated and specified in RD-02(TBW).
| File extension | Description |
|---|---|
| ca.crt | This file contains root CA certificate. |
| client01.crt | This file contains client certificate. |
| client01.key | This file contains the client private key. |
| client.ovpn | This file is OpenVPN client configuration. The extension .conf is mandatory, but the filename can be changed. |
a) Run the OpenVPN Program
The OpenVPN message. No config files were imported into the program.
b) Copy and Edit File
C:\Program Files\OpenVPN\sample-config\client.ovpn to C:\Users\Root\OpenVPN\config
The following lines need to be included C:\Users\Root\OpenVPN\config\client.ovpn
client

proto tcp
remote vpn.iplog.eu 1195

dev tun

resolv-retry infinite
nobind

persist-key
persist-tun

ca ca.crt
cert client01.crt
key client01.key

comp-lzo
route-method exe
route-delay 2
Connection to VPN
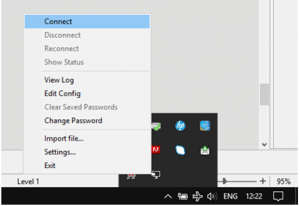
Right click to the OpenVPN icon in the notification area of Taskbar, select Connect.
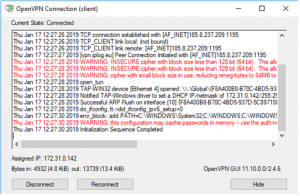
A Successful connection is logged in the dialog window, Initialization Sequence Completed.
